Friday 31 December 2010

Dipping my toe into the world of Art Cards


on sale
 >>>HERE<<<
☺☻☺


Monday 13 December 2010

It must be Monday again!

Because we've playing with clay again :o)


Monday 6 December 2010

Spoilers........or not!

This is not a photo of my experiment today with underglaze ceramic crayons...


Tuesday 30 November 2010

So, clearly November didn't quite go to plan!

but it did go somewhere...


Monday 20 September 2010

Penguin (part six)

Finished!
Here he is hanging up to dry...
and here, ironed and posing for photos for listing...

This one will be off to his new home tomorrow, but I think I'll be listing the design as a made-to-order option
☺☻☺☻☺☻☺☻☺

Sunday 19 September 2010

Penguin (part five)

Nearly there now :)
First up, was to get as much of the remaining wax as possible out of the fabric before putting it in the washing machine. This means soaking it in boiling water...
so that some of the wax floats out of it to the surface...
and then rinsing alternately in hot and cold water until you can't feel any more wax in it.
Then it goes on a machine hot wash (90ยบ), again for the purpose of getting any remaining wax out, but also so that any colour that is going to come out of it, comes out now.
The colours shouldn't fade after this with normal washing.
I have to say, it's hanging up to dry now, and looking very cute - but I'll save that pic for tomorrow when it will hopefully be dry and ready for ironing and sending off to it's new home :)


Saturday 18 September 2010

Penguin (part four)

Not got quite as far with this as I wanted to today, mostly because there is a queue for my washing machine at the moment of different coloured items that can't be washed together for the first wash!
He has moved on slightly though.
Now that it's dry, the next stage is to fix the dyes and remove the wax. The dyes are partially fixed just from being allowed to dry on the fabric, but to make sure they retain as much of their colour as possible, they need ironing too. Ironing also helps to remove some of the wax.
First the motif is ironed under a sheet of absorbent paper and a sheet of greaseproof paper (to protect the iron!)
The absorbent paper lifts out some of the wax as it melts...
That is then removed and the greaseproof replaced and the whole thing ironed again
As you can see in this next picture, there is still quite a lot of wax left in the fabric...
The dark areas around the penguin, and most of the penguin itself, are full of wax, so tomorrow I will be removing the rest of that :)

Thursday 16 September 2010

Penguin (part three)

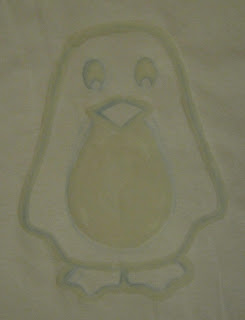
This morning, I painted in the motif on the t-shirt...
I use 'silk' paints for this (the type you would use for silk painting), and for the motifs, I use them neat and on dry fabric, as this means they will (hopefully) keep most of their colour. The greaseproof paper is still between the front and back of the t-shirt, so none of the colours from the motif will run through to the back, and at this stage I can leave it to dry flat, which reduces the risk of the colours bleeding.
Once the motif was dry, or nearly dry, I painted in the background...
The background colours are painted on the fabric wet, for a couple of reasons.
Firstly, I usually use two or three different colours, or shades of a colour, and they blend much better wet on wet.
Secondly, if I used these particular paints neat on the whole of the t-shirt, rather than just on the motif, it would make the end price of the t-shirt stupidly high!
At this stage, the t-shirt has to be hung up to dry...
The blues will be a couple of shades lighter at the end of the process than they look now in this picture.
The reasons that it can't be dried flat at this stage, is because both sides, front and back, need to be dyed at the same time, or any paint that has leeched through when you paint the front, like this...
...wont blend, once dry, with the new paint you add to the back, and it will look blotchy rather than blended.
Unfortunately, painting both sides and then drying it flat anyway doesn't work either, because for some bizarre reason, if you do that, the paint just completely disappears from the side that is touching the surface.
So hanging it is!
It will need to dry completely now, before I can move onto fixing the dyes and removing the wax, hopefully tomorrow at some point :)


Wednesday 15 September 2010

Penguin (part two)

Not had much time today to work on this t-shirt. Life and other orders got in the way ;) But this morning I chalked the design onto the t-shirt...
Sometimes I make a stencil for this stage, but most, including this one, I just draw on freehand.
The next stage is to wax the design. I don't use any special kind of wax for this, in fact I usually just melt down tealights, and for the t-shirts I prefer to use a brush to apply it rather than a tjanting, because it gives a more regular line and is a bit easier to control the flow of wax as well so that it only goes where you want it to!
Put a sheet of greaseproof paper inside the t-shirt, to stop any wax running through to the back.
The most important thing at this stage is to make sure your wax is hot enough to seep right into the fabric. When you hold it up to the light you should be able to see the light through it, and make sure there are no obvious gaps where the dye might leak.
I usually test the wax on a cloth first to see if it is hot enough, as it's not very easy to correct once it's on.

Tomorrow, I'll be painting in the motif, and possibly the background too if i get time :)

Tuesday 14 September 2010

Penguin (part one)

I know I've done a walk through before, but I've been asked if I can do a penguin t-shirt which I haven't done before so it will have the original design I'm working from as well in this one, which I usually skip.
It's for an age 2-3 t-shirt, so I'm going cute with the design. Also, simple works best for the hand painted t-shirts - hand dyed t-shirts can be more detailed and so can silk painting, because the silk paintings can be dried flat, and the dyed t-shirts are one colour so running isn't a problem, but these ones have to be hung to dry so the less potential problem areas there are to start with, the better!;)
So, after a bit of doodling, this is the design I've decided to work from...
Then, I need to think what it will look like with a white outline, instead of the pencil one...
..to decide whether I think it's going to look 'right' in batik, or not...
If you are doing batik or silk painting with children or beginners, drawing the design with a candle or white crayon onto paper first and painting in the colours, can give you a good idea of whether the design is going to work on the fabric or not.
Tomorrow, I'll be transferring the design onto the t-shirt and waxing the outline
☺☻☺☻☺☻☺☻☺

Wednesday 11 August 2010

How much(!!)....

...would you pay for a set of chessmen?
I'm struggling with pricing - just for a change!! My chess pieces are almost ready to be listed, I just need to get some fabric to line the box
and weigh everything to work out the postage, but I've been doing some searches to try and find out what people sell handmade chess pieces at and you're looking at anything from a tenner up to 5 grand (yes really!!!)

Now obviously I'm not going to charge quite that much for mine, but, not including all the hours spent searching the internet for a box for them (!), or all the hours spent travelling to and from the pottery studio, there are probably around 9 -10 hours work in them. Now, supposing I were to pay myself the national minimum wage for them, that would make them over £50...

Is anyone going to be prepared to pay anything anywhere near that for these?
hmmmmm....

Sunday 8 August 2010

Painting rainbows...

Sunday 1 August 2010

Creative Crafting Summer 2010

 
Hehe - I'm in a magazine!
Check out my tie-dying 'crafting project' feature on page 19, and then sit back with a brew and read the rest of the magazine
☺☻☺☻☺

Friday 16 July 2010

Drip......drip......drip........


I bought some bags this week which are now dripping purpleness all over my bathroom
and I have skulls dripping blackness all down my door!
Another thing that can't be hurried, but that I've been working on this week and is coming along very nicely (if slowly), is my chess set, which has now reached the glazed-and-waiting-for-another-firing stage
It's actually all looking scarily white at the moment, but ^^that^^ is - hopefully - what it will look like after firing!
Then all I'll have to do is work out how to package it! :-/

And I've also been working on a feature for the next edition of Creative Crafting, which has involved a lot of this...
...and this...
...and this...